Overview
When creating templates and other documents to be filled in, it is often useful to include drop-down lists for questions that naturally have a limited answer set or in cases where you would like to restrict the possible answers to ensure consistency in responses. Restricting responses is particularly useful when collating questionnaires and using the data for analysis and visualization (Charts).
The Advantages of creating a drop down list in Microsoft Word:
- Saves space on the template, document or form
- Provides an indication/(examples) of what the expected answers should be
- Ensures consistency in answers used across documents
- Eliminates spelling errors and typos
- Makes forms easier and quicker to complete for the end user
When to use a drop down list:
- When consistency of information is required. For example in the case of a questionnaire; for the question: “What is you favorite animal?” one respondent may want to indicate that a German Shepard is his/her favorite and animal, another respondent may want to indicate that a Poodle is his/her favorite. However for the purposes of your analysis, “dog” might be sufficient. Then by using a drop down list and including only dog, cat, fish, reptile etc, as possible answers, an in in depth data cleaning exercise can be avoided prior to the analysis of responses.
- When other Microsoft office content controls are not appropriate. Microsoft includes additional content controls including legacy and ActiveX controls that allow for the inclusion of variety of other controls. Radio Buttons and check boxes are examples of some of the controls that can be used in use-cases similar to that of the drop-down list. Often these will be more appropriate for binary responses (e.g. Yes/No), selection of multiple items from a single list, and smaller list (Less than 5 items). As a rule of thumb, always try to make data-entry as easy as possible for the personal filling out the document: selecting an item instead of typing a response, a one click option selection instead of two – e.g. a radio button response requires only one click for a Yes/No question, were-as a drop-down with Yes/No options will require the user to click twice.
Creating a drop-down list
Step 1.
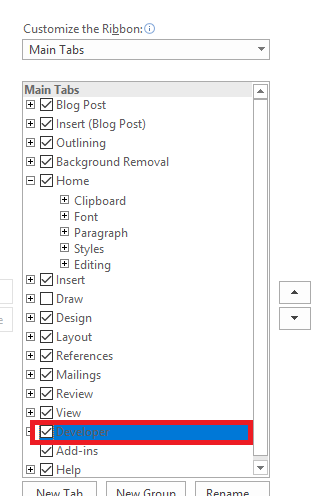
In order to make us of the drop-down list feature in Microsoft word the Developer tab needs to be enabled on the ribbon. This can be done by selecting the file menu on the Ribbon, (a) navigating to Options, (b) selecting Customize Ribbon on the left hand side of the new window that opens up, (c) and selecting the Developer checkbox that appears in the right hand table titled Customize the Ribbon
(a)

(b)
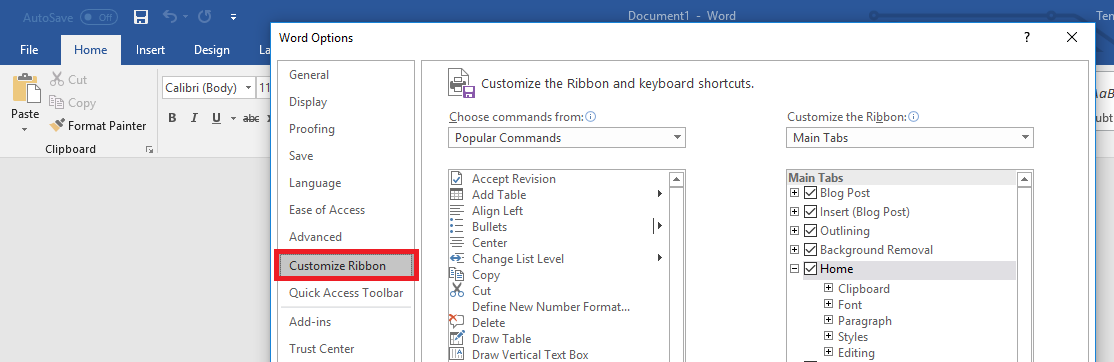
(c)
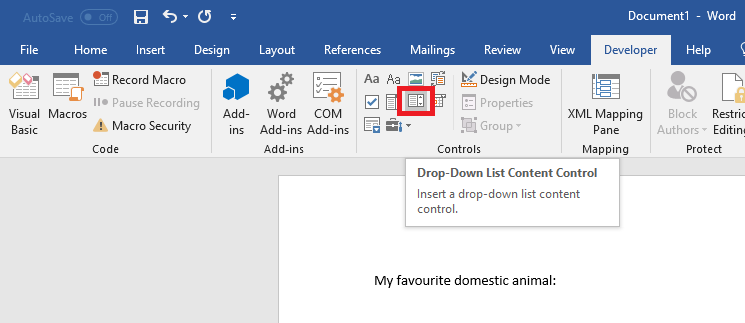
Step 2.
Next, a drop-down list control box can be added to the document. This is done by (a) selecting the Developer tab in the Ribbon, navigating to the controls section and selecting (b) the Drop-Down list Content Contol button.
(a)

(b)
Step 3.
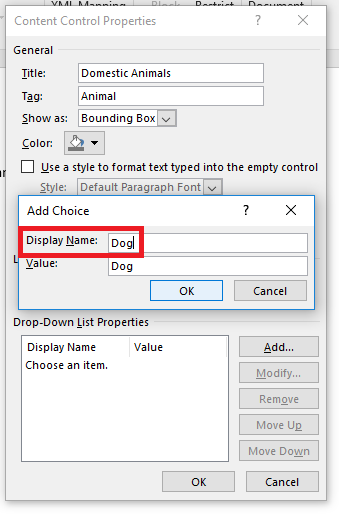
Once the Drop-Down List Content Control has been added to your document, you will need to add list items to the Drop-Down List. While the Drop-Down list is selected in the document, (a) click on the Properties option in the Ribbon, (b) complete the Title and Tag fields in the new window that opens and then select the add button. (c) Type in the name of the first item of the list in the Display Name Field and click the OK button. Press Add again to add additional items to the list. Once the list items have been added, (d) press the OK button
(a)
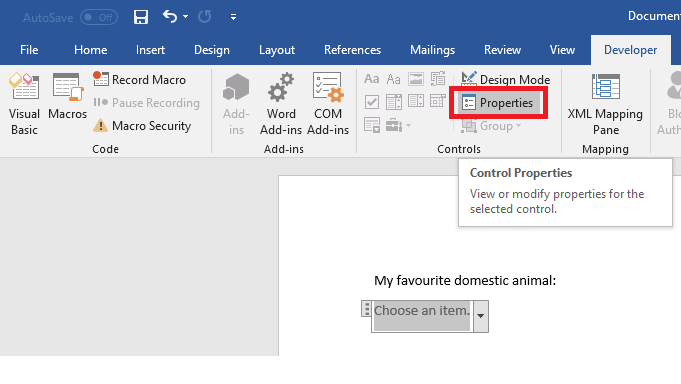
(b)
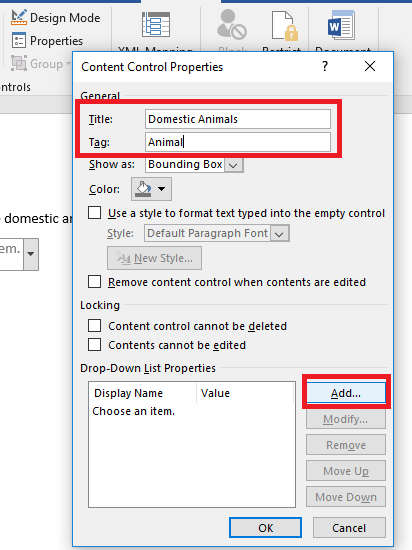
(c)
(d)

Step 4.
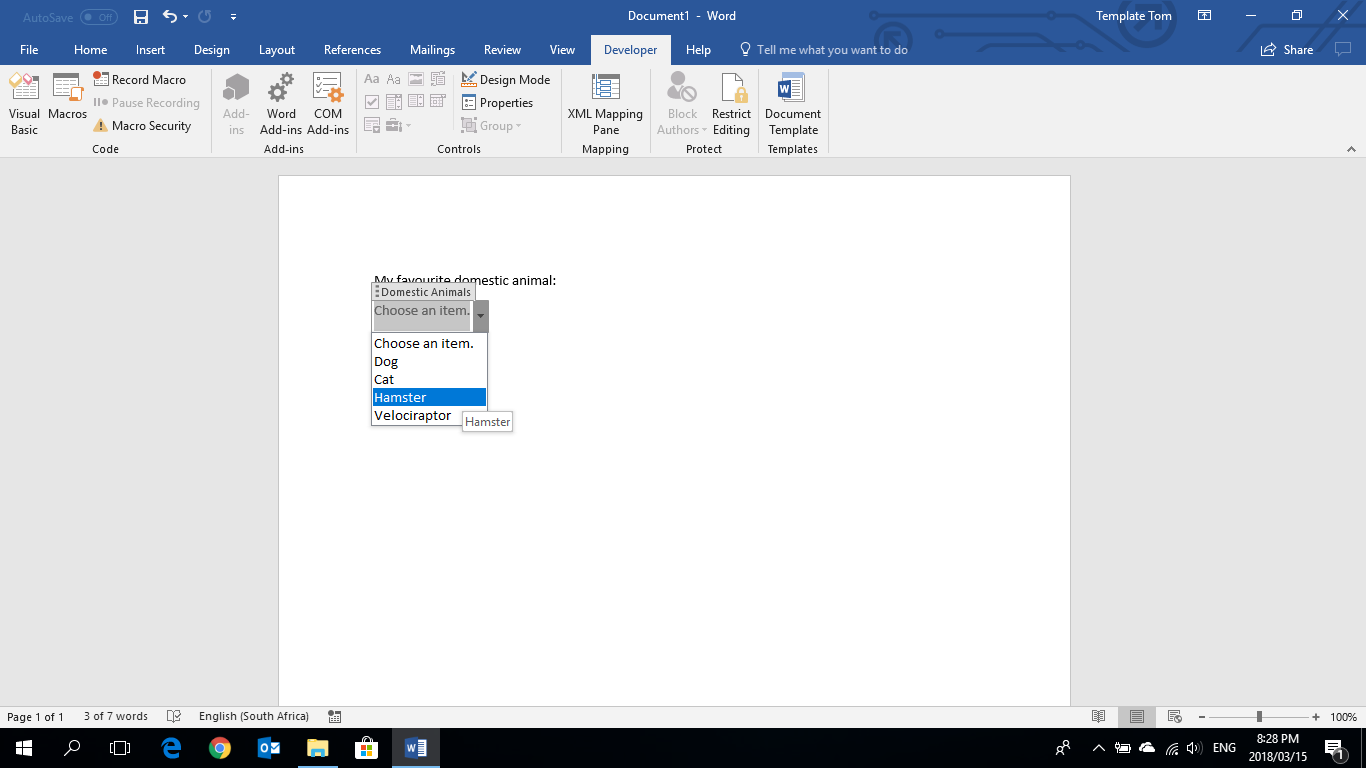
The final step in the process is to test that the Drop-Down List works. Note that when the Drop-Down List Control is not selected, the control is “invisible” and only displays the selected option as text (usually the first item on the list if not yet used). When hovering over the Drop-Down List Control, the text is shaded in grey, and when the Drop-Down List Control is selected, the title box is displayed with drop down arrow. When clicking on the arrow, all the list items created in step 3 will be displayed and available for selection.
Enjoy including Drop-Down lists in your future Microsoft Word Projects!
Additional Resources
The following YouTube Video briefly walks through the steps required to include a drop-down list in an MS Word document https://youtu.be/ysuf9XUvbrE
Very well presented information and follow on video. Made it easier for me to understand how to now include drop down lists into my documents
Thank you, I appreciate the feedback 🙂